Finally! An Easy, Turnkey Crown Molding Installation System Specifically Designed For The Average Homeowner
How To Buy

(Crown Molding Made Easy... Confessions of A DIY Weekend Warrior by Dr. Athas N. Kometas)
As a dedicated DIY weekend warrior, the details of construction have always fascinated me.
Understanding ‘the why’ and ‘the how’ things are done consumes my mind. I’ve done pretty much every kind of home improvement project from bathroom to kitchen remodels, to reinventing a room, so I decided to challenge myself with crowning my ceilings.
I had heard installing crown molding was a difficult undertaking. And I wasn’t disappointed.
I quickly found out there were no real systems on the market that helped you, just books and YouTube videos to make sure you didn’t make the ‘huge mistake’.
I remembered a chapter that I had read in Jay Silber’s book Decorating with Architectural Trimwork. Silber’s technique involved cutting individual wood triangular blocks with the correct spring angle and attaching those blocks to the ceiling/wall interface every 16”. The blocks would then be nailed to the double top plate with two long finishing nails.
It made sense, but having an older block house in Florida, I knew that the external walls would have minimal wood backing. And I was right in that I found a 1” X 2” horizontal furring strip close to the ceiling and a vertical 1” X 2” every 16” that didn’t even come close to the horizontal one. The interior walls mostly had a single top plate.
Attaching these blocks would be difficult as I quickly realized that the wall framing rarely lined up with the ceiling framing. In my house, the ceiling trusses are at 24” intervals and the walls were at 16” intervals. Where the walls were parallel with the trusses, there was no wood ceiling backing at all.
I remember thinking ‘It’s no wonder why the drywall tape was starting to separate!’.
I soon realized that installing crown molding would simply hide a poor drywall job.
I began by attaching the triangular blocks to the vertical 1” X 2” furring strip at 16” intervals. Then I discovered that the vertical 1” X 2” was often missing towards the ceiling.
I started to wonder about my sanity in undertaking this project.
Then, after a great deal of frustration, I started attaching the blocks to the ceiling joists and the horizontal wall furring strip. That worked until I hit the first overhead dormer.
Nothing was easy because the ceiling of the room had 3 dormers above it and there were missing ceiling framing in three 8’ sections. What became extremely apparent was that my house had minimal consistent wood backing to attach anything to whatsoever.
I knew I had a choice to make. Either nail the block to the wall framing (on the interior walls) with nothing to nail to the ceiling; or nail to the ceiling joists if present and not to the wall framing.
I own this home…so I wanted these blocks to be securely fastened. Relying on one flimsy nail did not make sense since I was putting up some pretty heavy crown molding. I realized that the blocks had to be secured to the walls and ceiling and decided to pre-drill all the blocks in a perpendicular manner.
I decided that where I had marked the vertical wall or ceiling framing, I would confirm the wood backing by drilling through the pre-drilled block into the framing and, without moving the block, drill through the other pre-drilled hole into the drywall. In this drywall hole I placed my drywall anchor.
With a #6 2-¼” furniture screw slightly protruding from the back of the block, the drywall anchor was easily centered. The other hole in the block received the #6 screw into the framing. Generally, where the trusses were parallel with the wall, there was no ceiling backing, so I used drywall anchors.
The evolution continues.
The upstairs of my home is built as part of the truss on 24” centers. This was too far apart for the molding I was using. Using my pre-drilled blocks, I just decided to place the blocks where I needed them and then use two drywall anchors and forget about the framing.
In some areas, I went 12” on center with some of the blocks attached to the truss system, and with the remainder I used only drywall anchors.
By the time I got to the last room in my house, I realized that I should not be cutting triangular blocks at all, as the wall/ceiling corner of the block often pushed the block one way or another due to poor drywall finishing.
I should have used a truncated block that has no corner at the wall/ceiling juncture.
Since I had finished my house, it wasn’t until a year later that I was able to refine my truncated block technique.
I have a large 4-bedroom home with 6 dormers which adds significantly to the irregular framing issue.
It also has extensive outside corners and plenty of coped inside corners.
I know that some carpenter’s place the crown quickly without wood blocks and shoot finishing nails at angles, sporadically hitting backing. I didn’t want to ‘pray’ that the ‘adhesive’ caulk would take care of everything.
Moreover, as a homeowner, I did not want to have to re-caulk and paint every few years because the adhesive caulk was asked to act both as a nail and a filler.
Since I am not a classically trained finish carpenter, I knew that there had to be a better way.
I thought...what if the truncated blocks were already attached to a truncated frame?
The entire frame could easily be placed into the ceiling wall interface and fastened using drywall anchors. I wouldn’t even have to worry about finding any studs at all. The only consistent thing in most homes is a single top plate, so I decided to attach to it.
Then I would simply attach the crown molding.
So that’s what I did.
The following describes the first ever ‘Crown Framing Assembly Made Easy’ technique.
And the birth of the EZCrown Molding Installation System™.
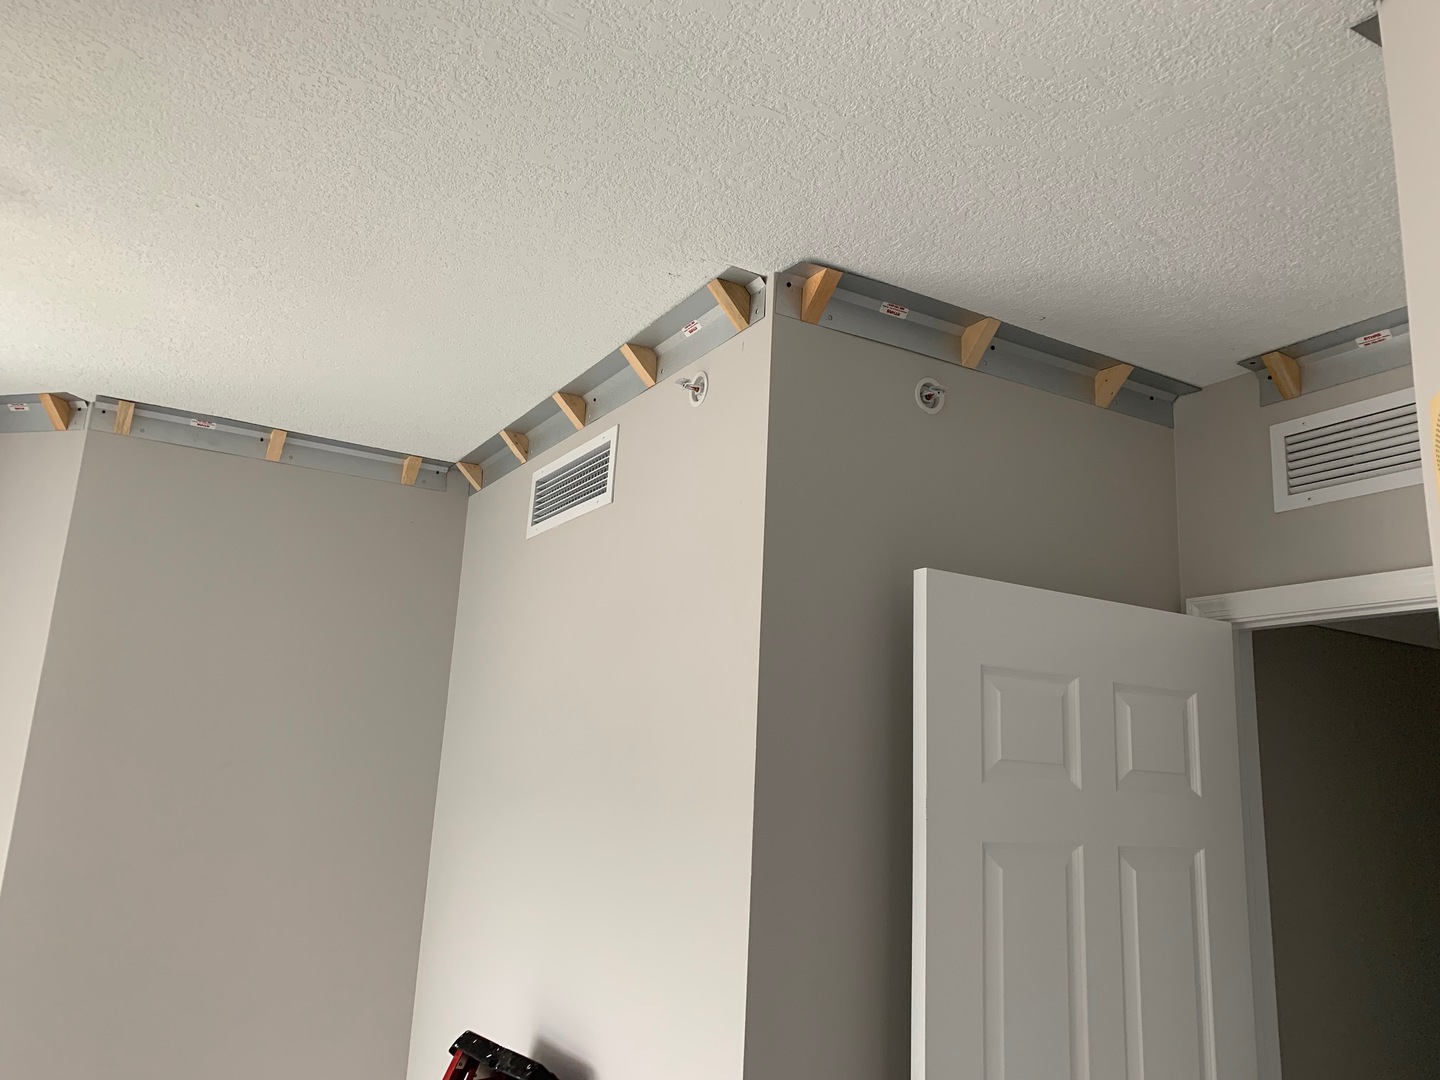
Truncated Frame and Block with Ceiling Member Pre-Drilled for Lead Drywall Anchor
The frame is truncated, eliminating the problems with the ceiling/wall juncture irregularities. The frame has holes in the ceiling and wall segments so that it is easily secured by drywall anchors without even having to search for wall studs or wood backing in the ceiling. The frame can also be secured to the top plate which is almost always present.
4 Foot EZCrown Framing Sections
The frame block assembly comes in 4-foot sections and is extremely lightweight. Using the EZCrown system, one person can now install crown molding. An additional bonus is this frame is ideal for placing crown in all masonry condominium construction. All you need is a few tap cons! The frame is easily cut with tin snips. I made the frame 4’ (actually 46-⅞”) and because each covers 5-1/4 linear feet, eight are what is required for a 10’x10’ room.
5-¼ Inch Crown
6-¼ Inch Crown
The EZCrown Molding Installation System™ accommodates crown molding from 5-¼ " up to 7-¼”. The spring angle must be 45°/45°. The wood blocks are every 14” on the frame.
As the system uses anchors to secure the frame, there is no need to find any studs or wood backing in the ceiling.
Just fasten the frame to the top plate! All the necessary fasteners are included.
And the best part? The system is EZ to use...