Finally! An Easy, Turnkey Crown Molding Installation System Specifically Designed For The Average Homeowner
How To Buy
Canada's handyman, Steve Maxwell, discusses EZCrown...
Also called miter saws, chop-saws make it fast and easy to complete the kind of smooth, precise, angled cuts every good crown installation requires. Once adjusted correctly, a chopsaw allows anyone to make cuts as quickly and as well as any professional carpenter. The best chop-saws for crown installation have two features. First, they spin a 10-inch or 12-inch diameter blade on rails that slide back and forth for wide cuts. A big blade with sliding action means crosscutting capabilities up to 12” wide and beyond. And second, the best crown molding chop-saws tilt both left and right from vertical. This is called “dual bevel” capability and it really helps with crown installation. Taken together, saws that can do both sliding and bevelling are called “dual bevel sliding compound chop-saws” and there’s a reason almost no one installs crown moulding without one of these tools on their side. Nothing else works as well, especially for beginners.
Paint-grade crown molding. Photo by Steve Maxwell
Apart from using a chop-saw, this is the most important advantage you can give yourself when it comes to installing crown well. If you’ve never installed crown molding before you’ll probably be surprised to discover what the most challenging part of the job is. Finding and making use of a solid support surface underneath the drywall to hold nails is essential to anchor crown molding properly, but it’s trickier than it looks without some kind of help. The reason is because house walls are almost never framed with crown molding installation in mind. In fact, some kinds of houses don’t have anything at all below the wall surface that will hold nails, and that’s where you need a solution.
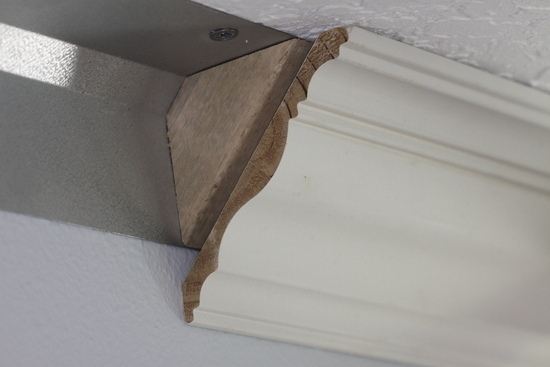
The best system I’ve seen so far for making it fast and easy to anchor crown molding is called EZCrown.
. Invented by Florida dentist Athas Kometas, this economical system uses a sheet metal base with angled wooden nailing blocks mounted to it. Fasten the sheet metal to the wall and ceiling, then nail the crown molding to the wooden blocks that are part of the EZCrown system. It’s simple but highly effective.
So how does a mounting strip make things easier? One advantage comes from the fact that you can mount anchoring strips anywhere along its length, or using drywall anchors if there’s nothing solid at all under the wall surface. The crown molding itself is mounted with precisely located and oriented nails driven into the mounting blocks, but it’s easy to drive them properly when using a mounting strip.
If you’re new to crown molding, you’ll want to make installation choices that are as easy as possible. And in the world of trim, there are two approaches for any situation: stain grade (the more difficult) or paint grade (the more forgiving). Stain grade installations use high-quality solid wood finished with a transparent or translucent finish, allowing wood grain to show through. This creates a beautiful look, but it also means that filler cannot be used to cover up loose joints. The filler would look terrible because it won’t be hidden by stain so you only get one shot at cut accuracy. You need to get the cuts perfect for stain-grade trim installations to succeed, and this is why the paint-grade option makes more sense for beginners.
Paint-grade crown molding, by contrast, is more forgiving than stain-grade because you can fill less-than-tight joints with latex caulking. Paint over this filler after it has dried and the results look great.

Sanding mop. Photo by Steve Maxwell
No matter how smooth a piece of wood seems when it’s bare, it can always benefit from sanding before finishing. When it comes to crown, mill marks are the main reason why. All trim is made by machines that have rotating planer blades and invariably tiny repeated marks are left behind on the surface of the wood by these blades. These might not be noticeable at first, but finishing brings out these imperfections unless you get rid of them first. Sanding crown molding my hand using 120-grit sandpaper is one option, but something called a sanding mop is better. It’s a rotating abrasive disk for a drill or drill press, made with narrow fingers of abrasive material. These fingers smoothen the trim but without rounding over the all-important crisp corners and edges. You wouldn’t think something like this would work, but it really does.

Corner blocks. Photo by Steve Maxwell
When Athas Kometas invented the EZCrown mounting strip system he did something else to make crown installation easier. The optional corner blocks
that are part of the system eliminate the need to complete any kind of angled corner cuts. The butt joint on the end of the crown simply butts up against the pre-installed corner block. You get an elegant result that’s simpler to succeed with than anything else because no angle cuts are required.
One of the nicest things about doing your own home improvements is the ongoing satisfaction it delivers. As nice as it is to increase the value and saleability of your home, you can’t beat the sense of satisfaction you’ll get every time you glance up and see some excellent crown moulding well installed by your own hands.
Steve Maxwell is co-author of The Complete Root Cellar Book